在 JavaScript 的世界裡,處理異步操作的方法有多種,其中最常被討論的就是 async/await 與 Promise.then()。這兩者各有特色與適用場景,理解它們的差異,有助於我們在開發中做出更明智的選擇。
接下來我將會從語法風格、錯誤處理、執行順序這三個面向說明一下兩者的差異。
語法風格與可讀性
async/await 的出現,讓我們可以用類似同步的方式來撰寫異步程式碼,提升了程式的可讀性。例如:
1
2
3
4
5
6
7
8
9
| async function fetchData() {
try {
const response = await fetch("https://api.example.com/data");
const data = await response.json();
console.log(data);
} catch (error) {
console.error("發生錯誤:", error);
}
}
|
相比之下,使用 Promise.then() 的寫法則是:
 1
 2
 3
 4
 5
 6
 7
 8
 9
10
| function fetchData() {
fetch("https://api.example.com/data")
.then(response => response.json())
.then(data => {
console.log(data);
})
.catch(error => {
console.error("發生錯誤:", error);
});
}
|
從上述例子可以看出,async/await 讓程式碼結構更接近同步邏輯,減少了巢狀結構,提升了可讀性。然而,Promise.then() 在非 async 的環境中仍然適用,且在某些情境下可能更為直觀。
Callback Hell 問題
在使用 Promise.then() 時,如果多個異步操作有依賴關係,可能會導致 Callback Hell(回調地獄)。當回調函式過度巢狀時,程式碼變得難以閱讀與維護。例如:
 1
 2
 3
 4
 5
 6
 7
 8
 9
10
11
12
13
14
15
16
17
18
| function fetchUserData(userId) {
fetch(`https://api.example.com/user/${userId}`)
.then(response => response.json())
.then(user => {
fetch(`https://api.example.com/orders/${user.id}`)
.then(response => response.json())
.then(orders => {
fetch(`https://api.example.com/order-details/${orders[0].id}`)
.then(response => response.json())
.then(orderDetails => {
console.log("訂單詳細資料:", orderDetails);
})
.catch(error => console.error("獲取訂單詳情失敗:", error));
})
.catch(error => console.error("獲取訂單失敗:", error));
})
.catch(error => console.error("獲取使用者失敗:", error));
}
|
這種嵌套的 .then() 結構會導致:
- 難以閱讀與維護:每個異步操作都巢狀在前一個
.then() 內部,增加了理解成本。 - 錯誤處理複雜:每一層
.then() 都可能發生錯誤,處理起來相當麻煩。
如何用 async/await 解決 Callback Hell?
async/await 可以讓程式碼變得更直覺,避免過度巢狀:
 1
 2
 3
 4
 5
 6
 7
 8
 9
10
11
12
13
14
15
16
| async function fetchUserData(userId) {
try {
const userResponse = await fetch(`https://api.example.com/user/${userId}`);
const user = await userResponse.json();
const ordersResponse = await fetch(`https://api.example.com/orders/${user.id}`);
const orders = await ordersResponse.json();
const orderDetailsResponse = await fetch(`https://api.example.com/order-details/${orders[0].id}`);
const orderDetails = await orderDetailsResponse.json();
console.log("訂單詳細資料:", orderDetails);
} catch (error) {
console.error("發生錯誤:", error);
}
}
|
這樣的寫法讓程式碼結構更清晰,且可以透過 try…catch 統一處理錯誤,減少 Callback Hell 的問題。
錯誤處理
在使用 async/await 時,我們通常透過 try…catch 來進行錯誤處理,這使得錯誤處理邏輯更為集中:
1
2
3
4
5
6
7
8
9
| async function fetchData() {
try {
const response = await fetch("https://api.example.com/data");
const data = await response.json();
console.log(data);
} catch (error) {
console.error("發生錯誤:", error);
}
}
|
而使用 Promise.then() 時,則是透過 .catch() 來捕捉錯誤:
 1
 2
 3
 4
 5
 6
 7
 8
 9
10
| function fetchData() {
fetch("https://api.example.com/data")
.then(response => response.json())
.then(data => {
console.log(data);
})
.catch(error => {
console.error("發生錯誤:", error);
});
}
|
需要注意的是,await 會等待 Promise 解決後再繼續執行,這意味著它會暫停所在的 async 函式的執行;而 Promise.then() 則是在將回調函式加入回調鏈後,繼續執行當前函式。
執行順序
使用 await 時,需要注意可能導致的順序執行問題。例如,以下程式碼會依次等待每個 fetch 完成,導致總耗時增加:
1
2
3
4
5
| async function fetchData() {
const data1 = await fetch(url1);
const data2 = await fetch(url2);
// 處理 data1 和 data2
}
|
為了提高效率,我們可以使用 Promise.all 來並行執行多個異步操作:
1
2
3
4
| async function fetchData() {
const [data1, data2] = await Promise.all([fetch(url1), fetch(url2)]);
// 處理 data1 和 data2
}
|
這樣可以同時發送多個請求,縮短總的執行時間。
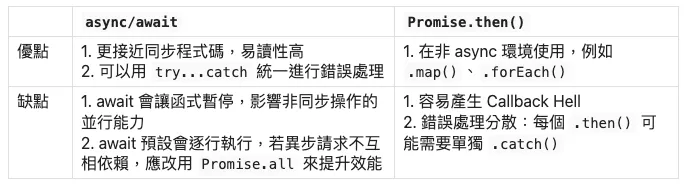
總結
為了更清楚地比較 async/await 與 Promise 的差異,我們可以用表格來整理它們的優缺點:
以上就是今天的分享,我們下篇文章見 👋🏻